It’s May, which means it’s air-layering time for me here in Florida.
I have quite a workload of air-layers lined up this month but I thought I’d share some tips I’ve learned along the way.
One of the easiest trees to air layer is an elm.
Therefore, today’s subject is an American elm.
For all you plant nerds out there, yes, I did say “American elm”.
Ulmus Americana to be precise.
For some reason, the beetle that transmits Dutch elm disease just has not made it to Central Florida yet.
We have an enclave of wild American elms here that are still growing strong.
Doing the research for this tree, I learned something interesting; I’d always been told the the variety of American elm we have here is called the Florida elm, or ulmus Americana “floridana”.
There is no such recognized variety.
In fact, there are no varieties of the American elm.
Now, there are hybrids (a cross between two types of plants) but, genetically, the tree that grows in Ontario, Canada is the same as the one that grows in Orlando, Florida.
Neat, huh?
Another odd thing about the American elm:
Most deciduous trees are triggered into dormancy by the shortening day and the lack of light that that entails (most people think it’s the cold but it’s not…trust me).
The American elm doesn’t respond to this low light trigger and won’t lose it’s leaves until the first frost burns them.
Weird…but true.
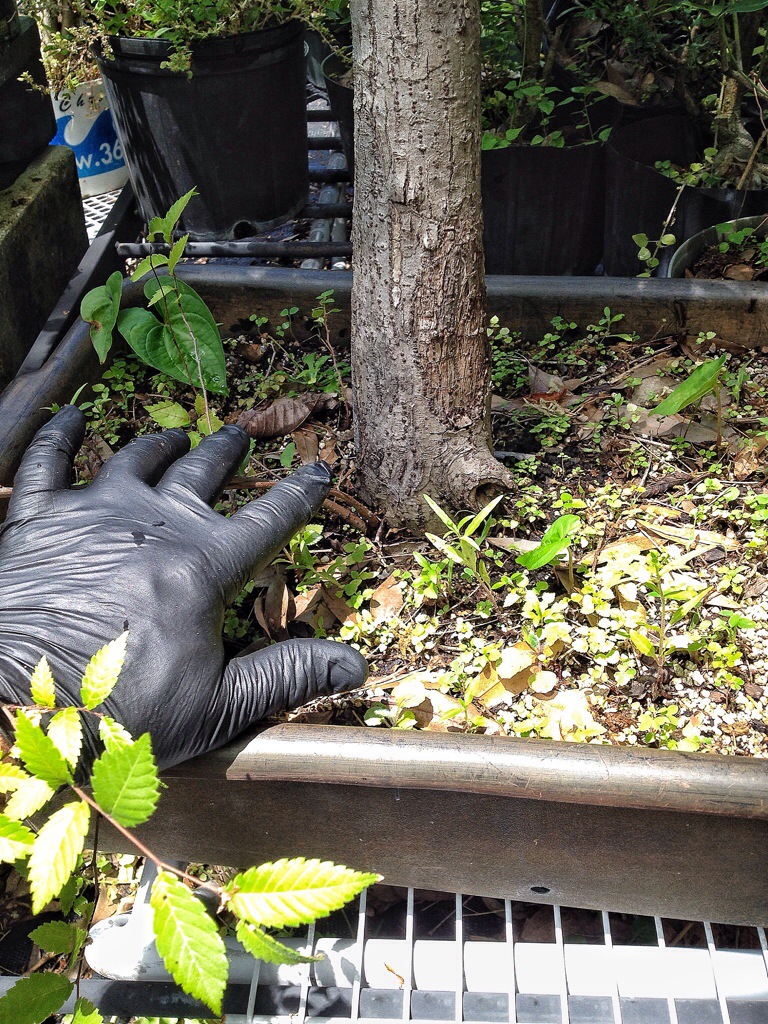
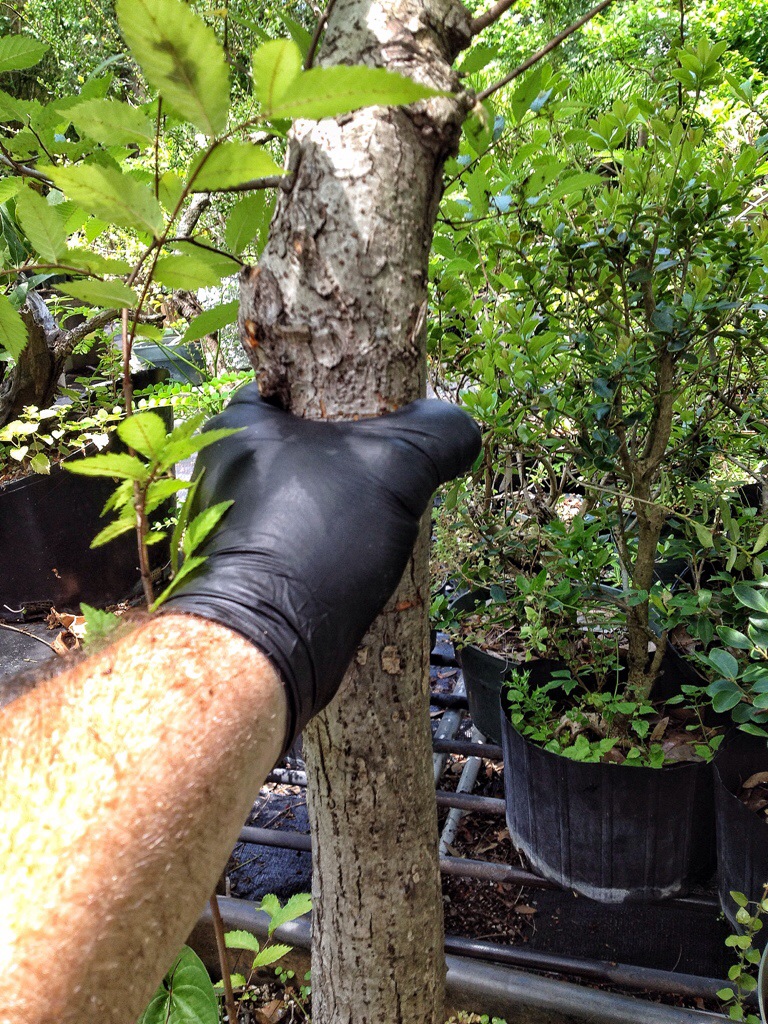
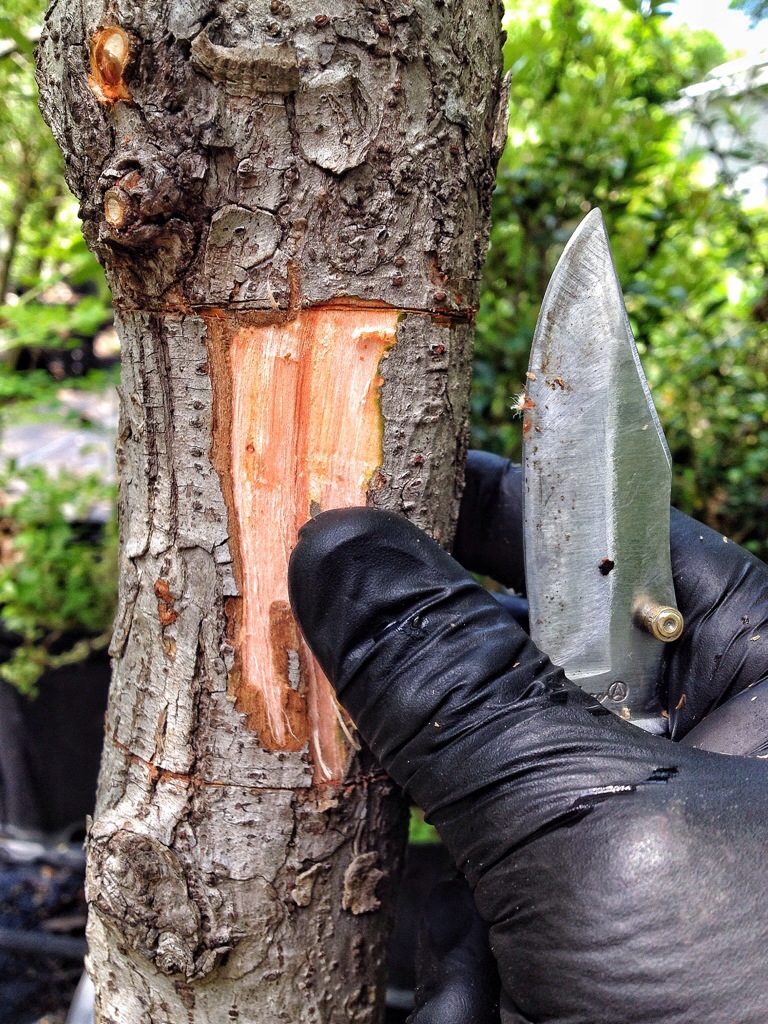
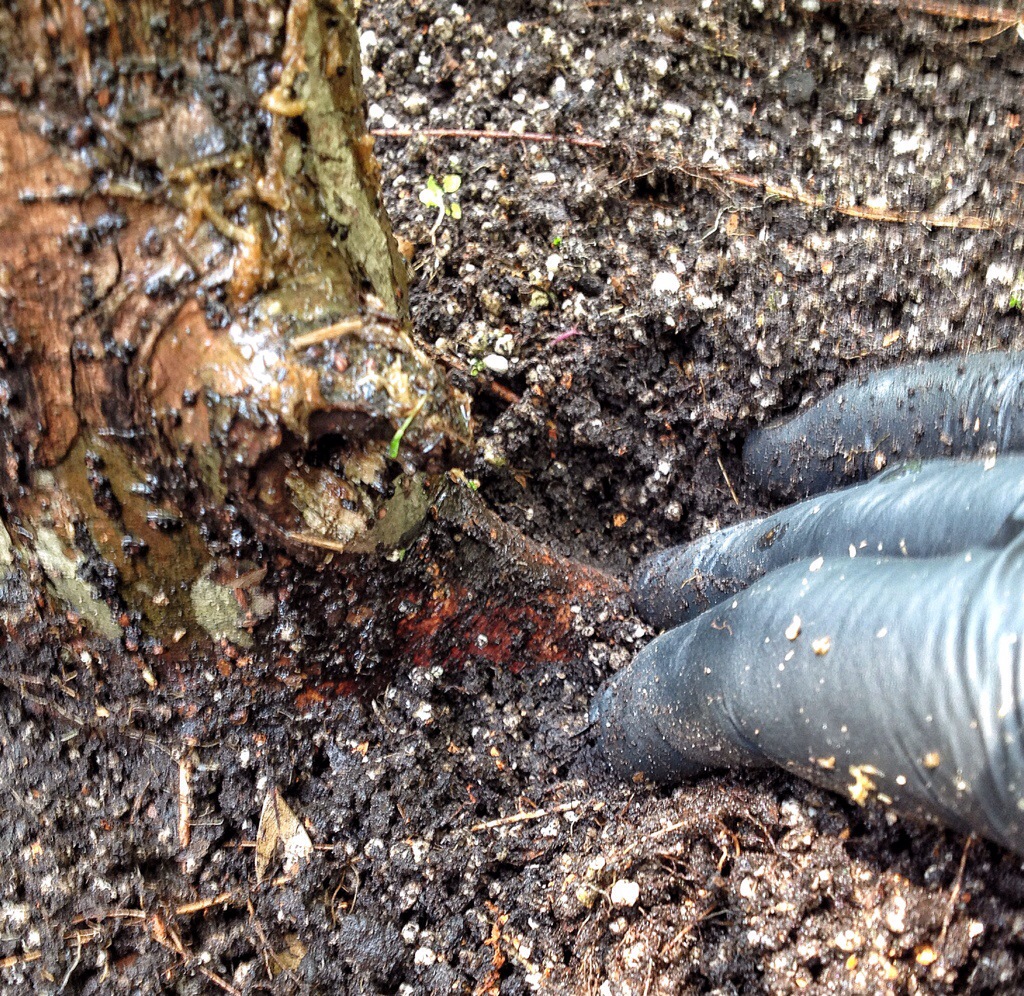
Anyway, here’s the tree and I’m all ready with my serial killer gloves.
The reason for the gloves (besides the obvious joke about serial killers, which will never get old) is that sphagnum moss sometimes has a fungus that, if it gets into your body, could cause a serious infection that requires months of expensive treatments to rid yourself of.
I use the regular sphagnum moss from the Midwest (I’m a poor man) but if you are concerned about the fungus, you can buy the special Chilean sphagnum that is free of it. It’s called “premium orchid moss”.
But I’m just a common man, I drive a common van, and I can’t afford that moss.
When I collected the tree I left it taller than most will recommend.

And there’s even a bit of reverse taper.

These two facts: too tall and reverse taper make this tree perfect for an air layer.
Which was my plan all along.
I’m a clever lad.
Sometimes, when I walk through doors, my ears scrape on the door jamb, my head is so big.
The perfect spot for the airlayer?
Right at the reverse (obverse) taper spot.
See, I told you I was a clever lad.
The last time I tried to airlayer an elm this large the damn thing healed over.
Yeah, really.
Imagine my surprise.
This time I’m going to make sure.
First step:
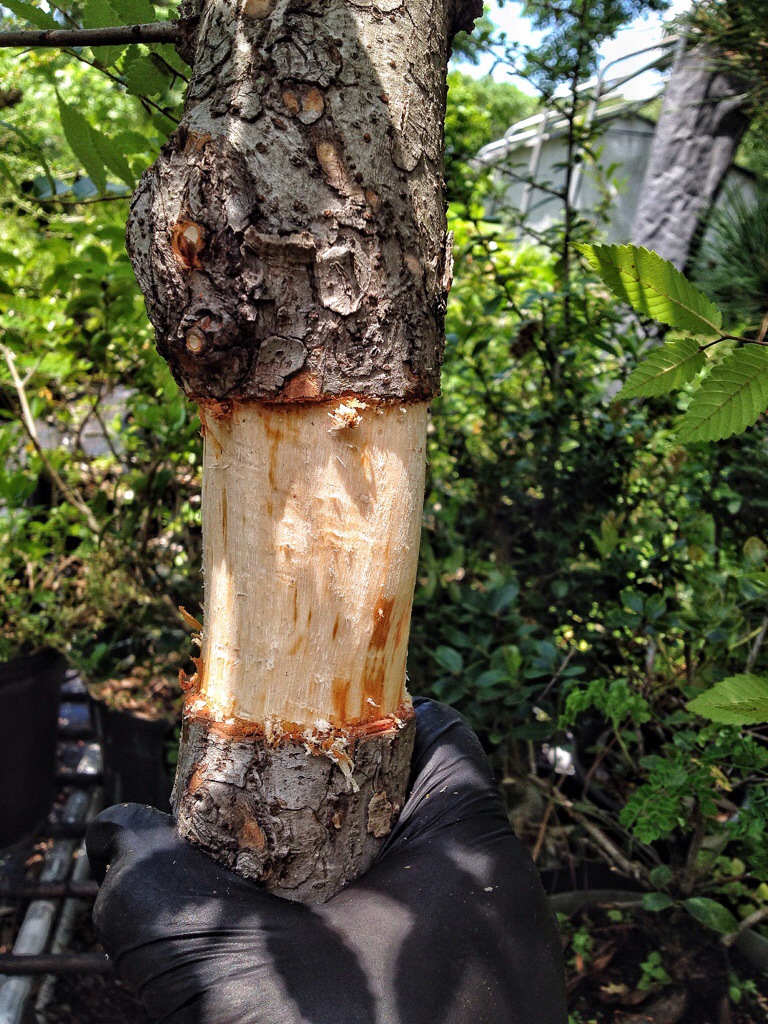
Ring cut the bark down to the wood, what is generally know as the sap wood.
Or, to be scientifically pompous, it is known as the secondary xylem.
Just to satisfy those so inclined, let’s break down the layers of the tree.
From the middle out-
The pith or medulla.
The primary xylem or heartwood.
Secondary xylem or sapwood.
Vascular cambium.
Secondary phloem.
Primary phloem.
Cortex.
Cork cambium.
Epidermis. Which is the bark.
We want to get down to the secondary xylem layer or sapwood.
How can this wanton removal of the outer layers of a tree not kill the tree?
This is the mechanisms and how a tree works, simplified:
You have two areas, the roots and leaves and, in between, a stalk or trunk.
The trunk is the pipeline between the two areas.
The leaves make food from the process of photosynthesis.
The roots collect water from the soil.
The trunk moves the food down and the water up.
Each layer has it’s own job in these processes and, when air layering, it is those processes that we are exploiting to induce root growth.
The secondary xylem is the path that the water the roots travels upward to the leaves. Hence the name “sapwood”.
The phloem is the path that the food travels down.
As long as the sapwood is intact when we remove the first six layers and the tree is getting water, the top won’t die, and when we interrupt the phloem, stopping the food from reaching the roots, the tree responds by growing new roots at the cut end.
Got that?
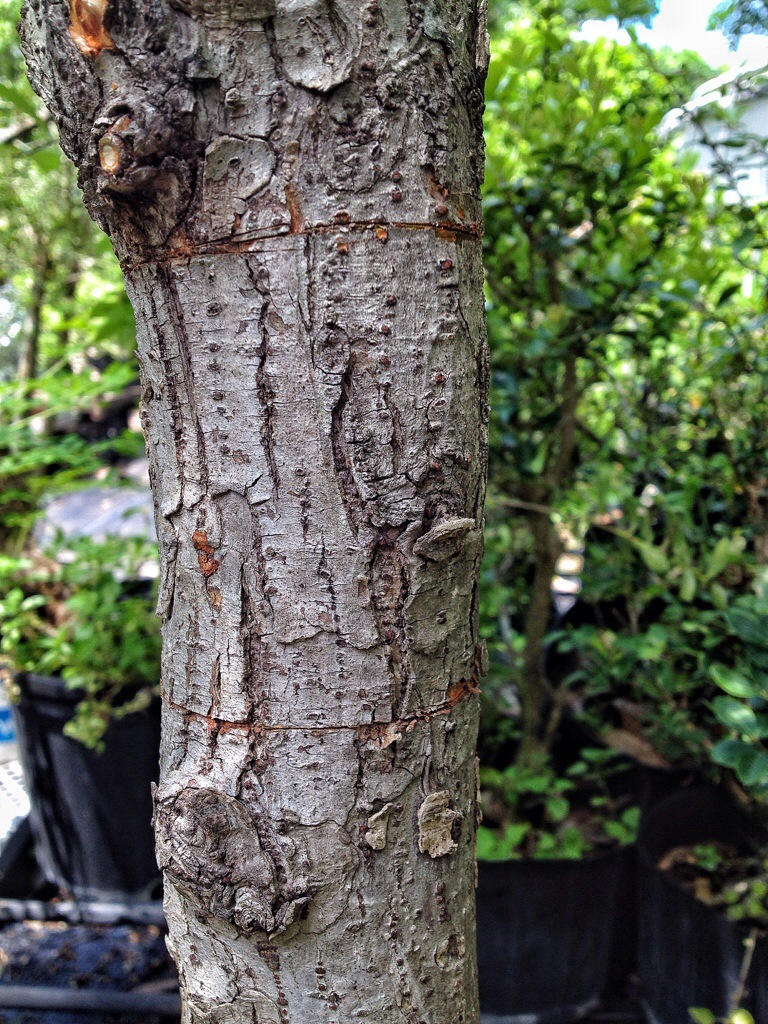
Let me illustrate.
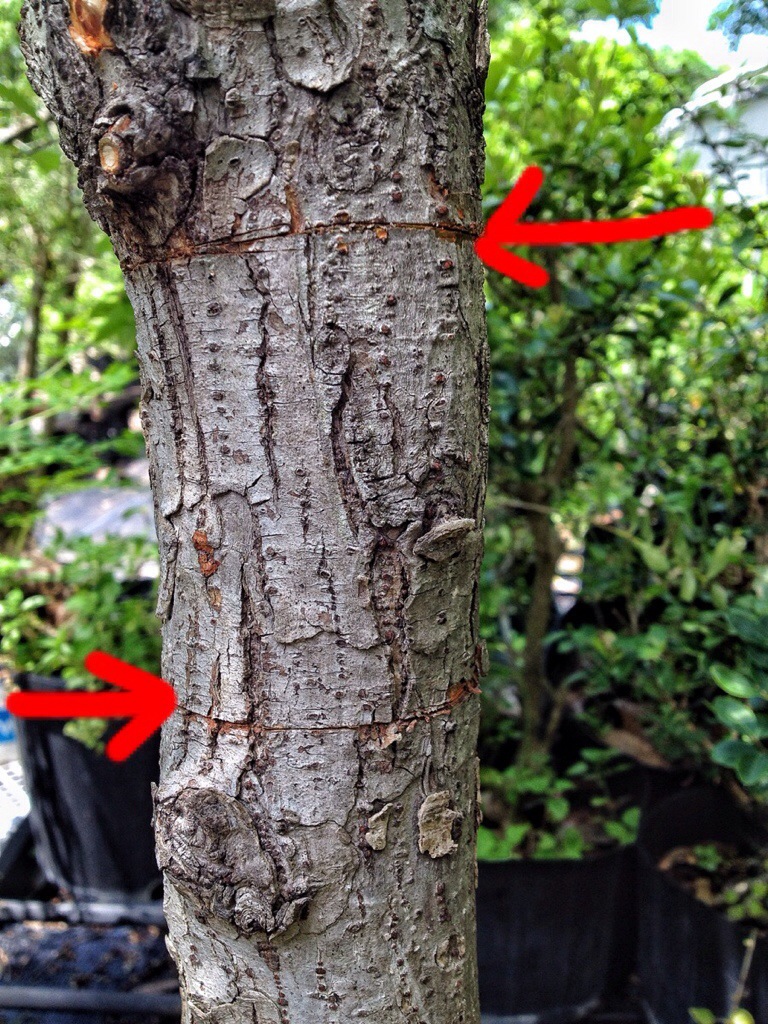
Usually the advice is to make the ring cuts about the same distance away as the branch or trunk we are trying to layer.
In this case I’m making that interval bigger, because of my experience with the cut healing.
Using a sharp knife, start to peel away the layers.
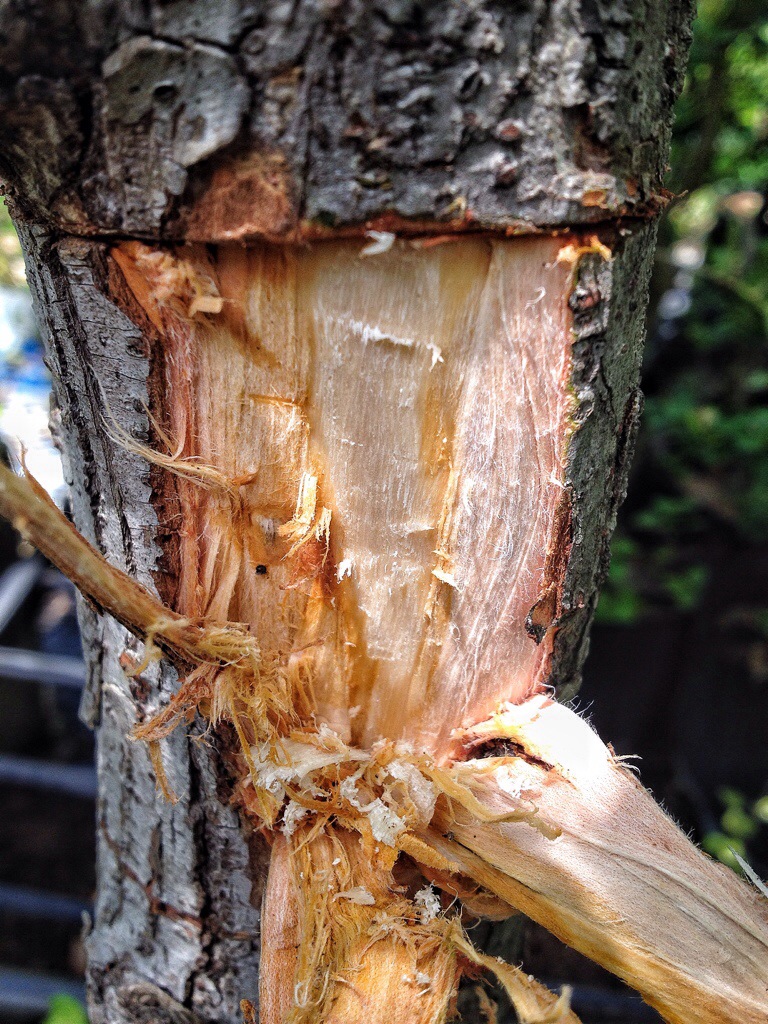

In my research for this piece I get a laugh at how easy all the other authors try to make the removal of the layers to the xylem look.
There’s one picture when the bark is whole, one where they’ve scored it, and a third where it’s the sapwood is clean and pretty.
It’s not always that easy, so take heart and don’t think that your knife skills are lacking.
Just be thorough and you’ll be successful.
This looks like the sapwood.
Slow and steady, damn this elm bark is thicker than it looks.

Almost done.
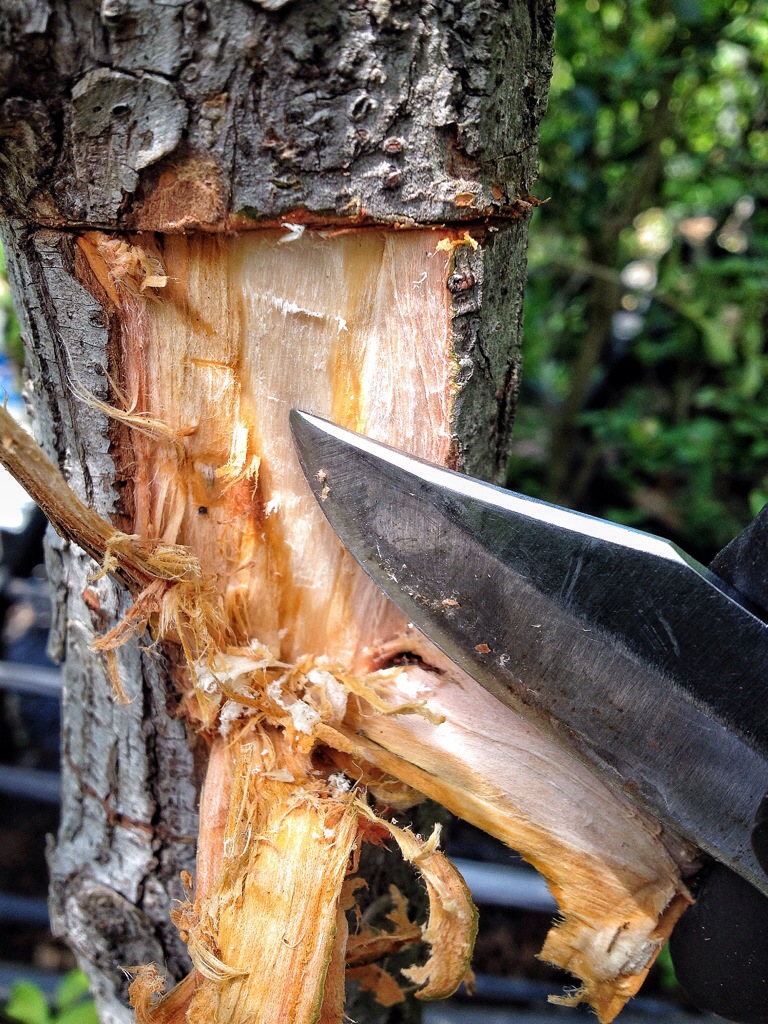
One technique is to simply scrape down the the wood.
You’ll know give reached the wood layer when you’ve, well, gotten to the wood.
Don’t worry about scratching the sapwood, it’s thick enough that you won’t impede the water flow unless you take an axe to it.
One last bit about the layers.
Remember the inner or vascular cambium?
Remove that, which in our case, has turned a nice orange for us to better see it.
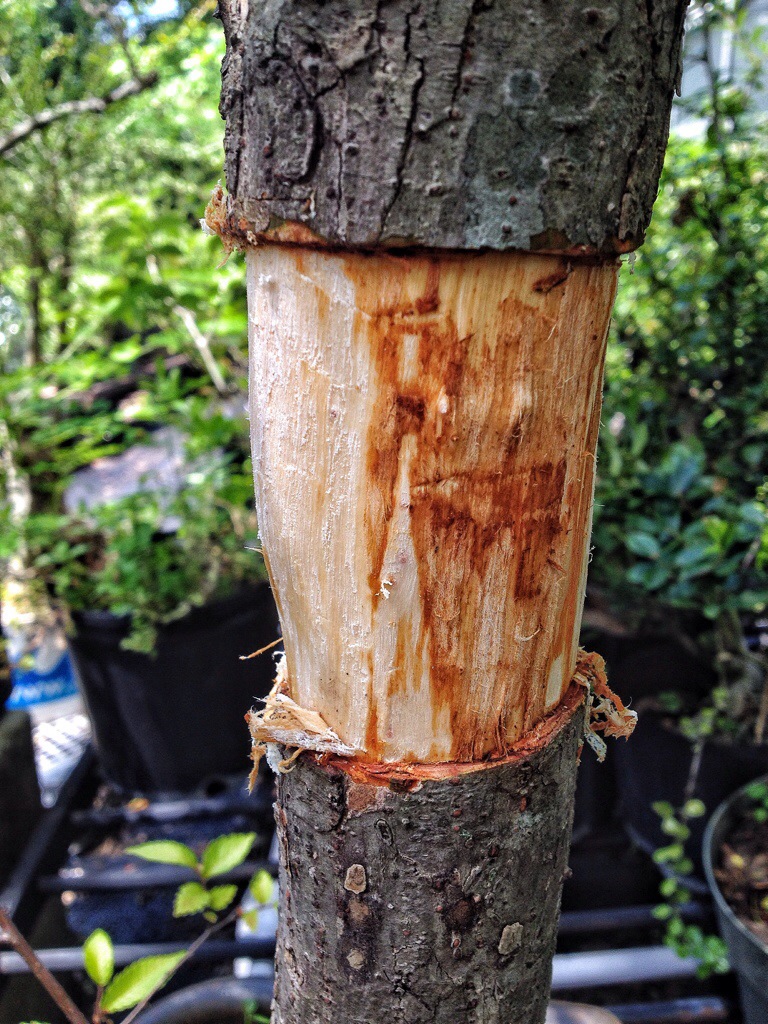
Nice and clean.
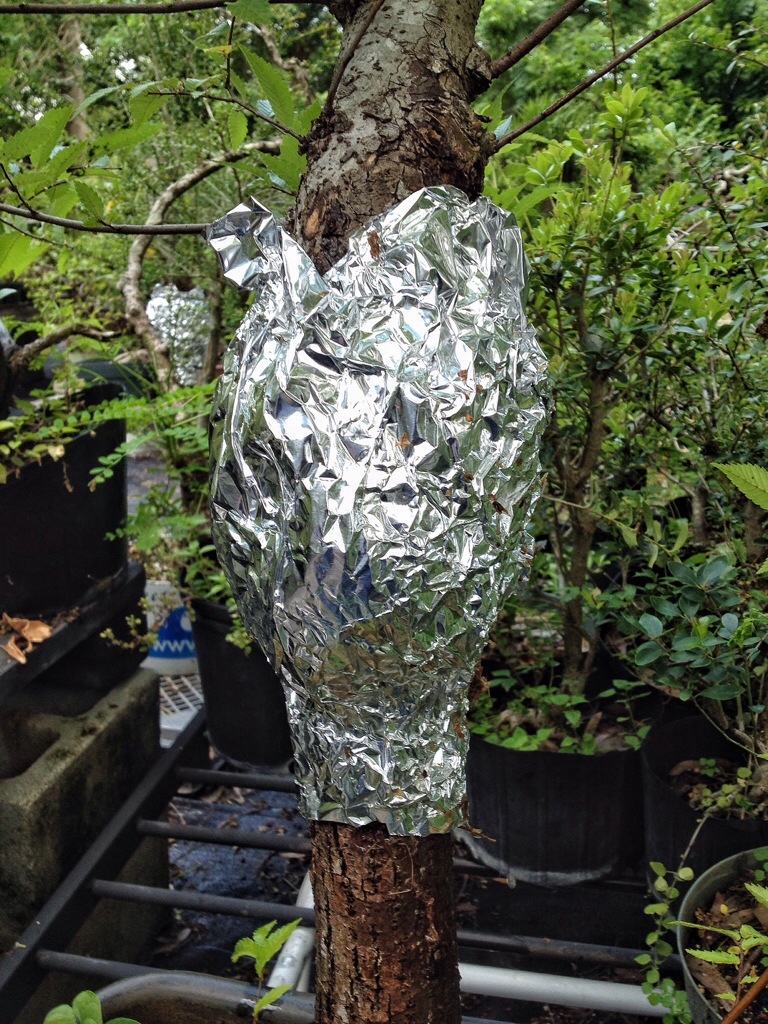
Now for the sphagnum.
I’ve soaked it in water to get all the fibers totally saturated.
I prefer to use aluminum, shiny side out, to hold the sphagnum in place.

The reasons being: first, it conforms to the sphagnum without a need for extra tying and, secondly, it reflects the sun and keeps the sphagnum at a more ideal temperature (below 90f).
In Florida that’s important.
Be very careful to make sure that your moss is touching the correct area on the ring cut; mainly the top.

And make sure you use enough moss.
If you’re in doubt, add more.
Don’t be cheap now, pile it on thick
And even though I don’t need to, I tie the the bottom tightly with wire.
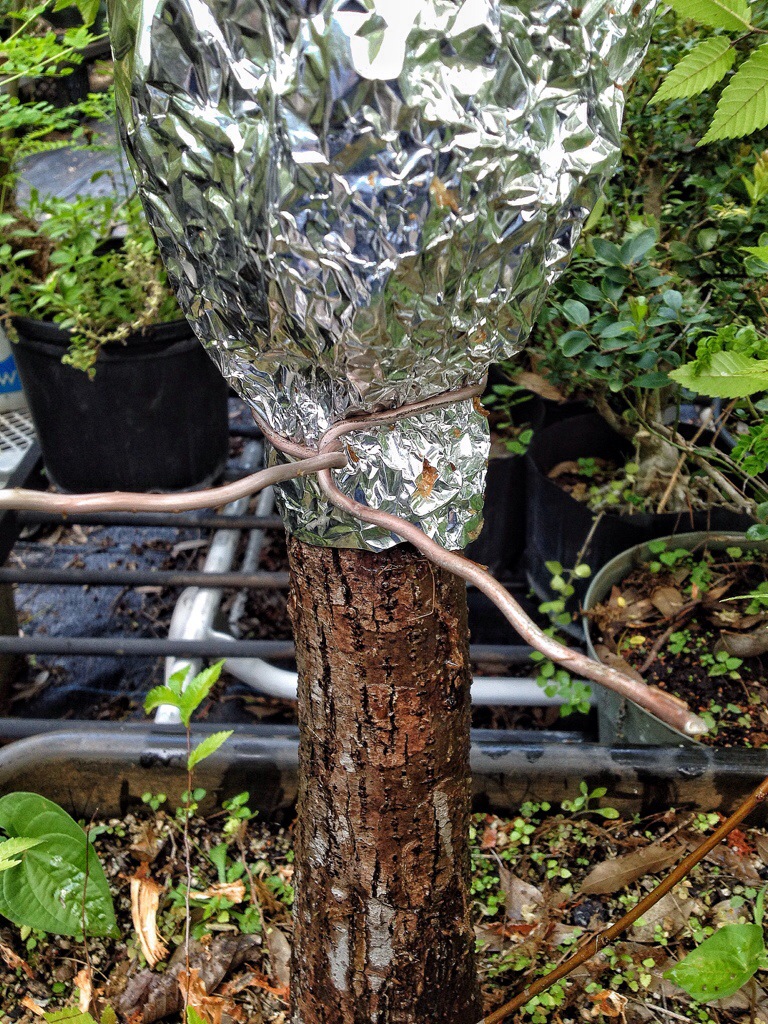
But only loosely on top.
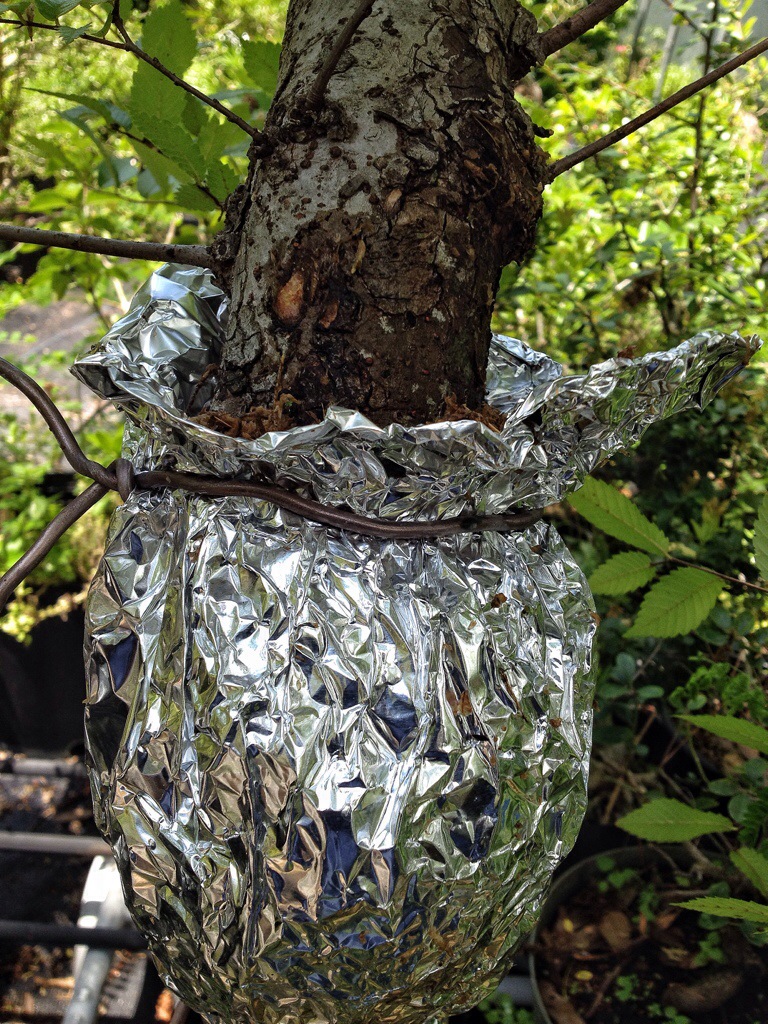
And you’ll notice that I formed the aluminum into a cone shape.
This is so that every time I water, I can spray some into the top to make sure the moss stays moist.
That trick is worth at least a dollar.
Please remit payment by mail to the address at the bottom of the screen, plus a separate shipping and handling charge of $9.95.
But wait!
I can repeat the same trick on a fortune cookie sized laminated sheet for free, just remit a second shipping and handling charge.
*results may vary, and actual product may differ from the advertised image*
Now just a few housekeeping details to take care of.
There is always a question of what to do with the top growth.
To trim or not.
I do trim the top branches of the airlayer.

The reason: cutting the top will stimulate new growth, new growth means new roots, and we are trying to grow roots, right?
Next, fertilize the bottom.

Errr… Weed the bottom and fertilize heavily. I use Milorganite.
And lastly, water well.
My friend Allen Carver of Jupiter Bonsai says that the magic number for good root development is six weeks.
Which should mean that I can remove this by the end of June.
Remind me if I forget to update this post.
I’m anxious to see how it turns out too.

Ever used the Spanish moss that grows in all the trees around the Southeast? It’s everywhere here and thought I might try it. On the other hand, I haven’t seen any artists use it so there may be a reason for that.
LikeLike
Spanish moss isn’t really moss, it’s an air plant (tilandsia) that is alive.
Sphagnum has an antiseptic quality and a moisture retentive ability that makes it ideal for airlayering.
LikeLike
common man, common van
‘Cause high-browed people lose their sanity
LikeLike
I think this may have deserved a doodle: “Sometimes, when I walk through doors, my ears scrape on the door jamb, my head is so big.”
Nice post, I will be doing some maple air layers and like the aluminum foil idea. Love seeing your frequent posts keep them coming.
LikeLike
as always, great post! educational and funny! I have not tried air layering. what would you say is your success rate, on average? is it different between species? tropicals higher? see you soon!
LikeLike
The bigger the tree it seems the less the success rate. It must have more strength to close that ring cut.
Ficus don’t need airlayers but the Brazilian Raintree is easy to airlayer.
LikeLike
I’ve never tried air layering because I never had anyone who could explain it to me. Nice work. I’ll try it this year. Thanks for the post and updated blog — really enjoy reading it.
LikeLike
Do you ever use rooting hormones to accelerate the process?
LikeLike
I don’t use rooting hormone. The trees I use tend not to need them.
There is some current research that rooting hormone actually cause the rooting to take longer.
LikeLike
Try this trick
Cover the area with aluminium a month or two before hand to keep the light off the trunk.
This is akin to the trunk as it goes below ground.
The physiology of the tissue will change to one which seems to develop roots better.
I thank you for the advice on the fungi in the sphagnum moss.
I have literally used tons of moss over the years and did not know of this fact.
I will spread the word through the nursery association members and the International Plant Propagators Society IPPS.
What a great time we live in for finding information so easily.
LikeLike
Looking forward to seeing how this turns out!
LikeLike
The current thinking (Walter Pall even) is that live sphagnum works better. I’ve been using it on ground layers on trees up to 400 years old and have good results. Also I don’t cut any branches, more leaves, more roots. Many paths lead to the village. We’re all experimenting eh?
LikeLike
What a great post. Informative and entertaining. I’m curious about the next steps though. Once you have cut it off under the roots, do you plant it in the ground, a nursery pot, or straight to a bonsai pot?
I am going to be air layering from a 20+ year old cherry blossom tree soon but I’m a beginner for the most part.
LikeLike
I put them into a nursery container myself. Some will put them into a bonsai pot.
LikeLike
Any update on this tree?
LikeLike
It must have died since no update!? 6 weeks was way to soon for a piece of that size anyway.
LikeLike
That was from 2014 actually
LikeLike
Somewhere I read that you don’t want to cut the airlayering top branches to grow more branches until right after removing the newly airlayered plant from the original plant.
As I understand it the theory is when starting airlayering any plant, you want the energy going primarily into the root production, and less into the production of growing new stems and leaves. Further you want to keep as much follage as practical during the rooting process since that helps in the photosynthesis which helps produce more food energy (sugars, carbohydrates) that helps to grow new roots quicker.
After the roots have grown fully around all the airlayering surfaces, you then remove the new plant and lightly prune excess top branches with foliage (never more than one third of the total branches of foliage). Then you have a better foliage to root ratio that can better support the new smaller root system. Then once the new root system becomes acclimated and grows further into its new environment the foliage will reflect that root growth with more foliage growth.
Most airlayering that falters is right after removing the new plant, similar to transplant shock. So less canopy at this time means the current small root size can support it and will have a better chance to rebalance the natural canopy to root ratio slowly with less stress, and more chance of plane survival.
LikeLike
What you say is true.
But the weird thing about horticulture is, though it’s based on science, the practice of it is often an art. Much like surgery or bonsai.
LikeLike
You referred to May as air-layering time. Is it due to the rains and the humidity? Is it advisable to try air layerings in the dry season, say spring?
LikeLike
By May the new growth will hopefully have hardened off and started to send sugars down the branch. It’s those sugars that make the tree grow roots
LikeLike
I learned some things from reading this. Thank you! Did you ever post an update of how this tree turned out?
LikeLike
I haven’t, but the layer worked. I haven’t done anything with either the top or bottom yet, except to decide that the bottom is going to be a broom style
LikeLike