This post will show some mechanics of how I reduce a landscape nursery grown plant ( in this case an ilex vomitoria ” shillings”). I am processing these for an upcoming workshop in Cincinnati.
First we begin with the stock plant:

It was in a seven gallon container and stood about 2 1/2-3 feet tall.
The goal is to put it into an 8″ wide bulb pan that is 5 inches deep.
The timing of this operation is critical; learn about the species you are working on and it will tell you when to do this. For the ilex this can be done in early spring until the end of spring.
This photo shows a sign I have been looking for:

The stems are turning red. This tells me that the new spring growth is imminent.
I like to take advantage of seasonal growth to kickstart whatever work I am doing on a particular tree.
An example; on my deciduous trees I will not make major cuts in the winter. The reason is,they will sit until the spring comes along and then start to callous over. People do it all the time though and it won’t kill the tree. But it takes longer for it to heal.
Learn about the species you are working on: the development will be quicker and healthier.
Any way, back to my ilex.
First the saw:

And violá

And then some pruning:

Next we will address the base of the tree.
I know,from working on ilex in the past, that the basal root flare (the nebari) will be buried quite deep. And there is no casual chopstick method to unearth it.
So, using scissors,concave cutters,root hook, strong jets of water and much sweat and cursing we get this:
Before

And after

I have exposed about an inch of trunk and a good flare.
Next we reduce the roots to fit into the pot.

Make sure the large roots that go straight down are trimmed as though you are going to put them right into a bonsai pot now, even though it’s going into a training pot (it is better to give the tree only one shock and recover from it than 2 shocks and not).
Here is the fit:

Notice the amazing amount of feeder roots even though I removed about 80% of the root ball. This species is considered a xeriscape plant and can survive prolonged droughts in the ground. But not in a bonsai pot. Water it!
When I place a plant in a pot after I have root pruned it I always tie it in with wire. I have four children and cats. Any bumping now will set back any new root growth.
I am using the “standard” Florida bonsai mix of red lava rock, calcined clay and pine bark. I have sifted to 1/8 of an inch.
Temperature has a great deal of influence on root growth. I will need to protect these trees (now that I have done this)from temps below 45 Fahrenheit. Conversely , I will not do this when temps get above 90. That is generally when roots have a summer dormancy.
Here is the prepped tree:

And some others:

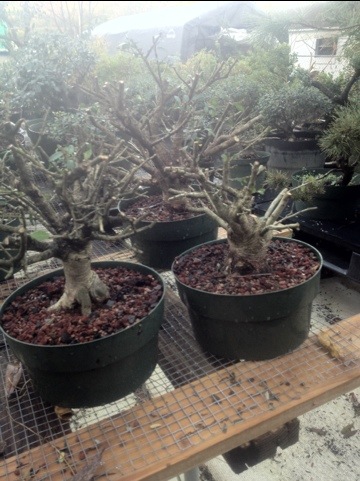
I have not done any styling beyond the initial haircut and removing some branches. These are for a workshop in June and will be filled in nicely by then.
It would not hurt to style them at this time.
I always fertilize after potting. I don’t use a harsh fertilizer though. I prefer Milorganite® to anything. It is provided to us through the generous deposits of the fine citizens of Milwaukee.
But use what you have had success with in the past.

Very informative. Well done.
LikeLike
Great post, this answers a lot of my illex-related questions. Going by some of your trees, illex have such great potential.
LikeLike
You’re the Ilex man. I just collected a few from my yard. Fun tree and good for bonsai. Like to see more of them.
LikeLike
Adam, How about a winter fertilizing schedule????
LikeLike
I don’t have a special schedule. Fertilize and trim now (October ). I use Milorganite exclusively unless they are chloratic (yellow) then hit them with iron. It’s important to get them green before the cold comes because they won’t green up again until spring and the new growth will be affected.
LikeLike